THM125C/3T40


The THM125C transaxle is a hydraulically controlled, fully automatic unit for FWD and mid-engine RWD vehicles, which provides three forward gear ranges and a reverse.

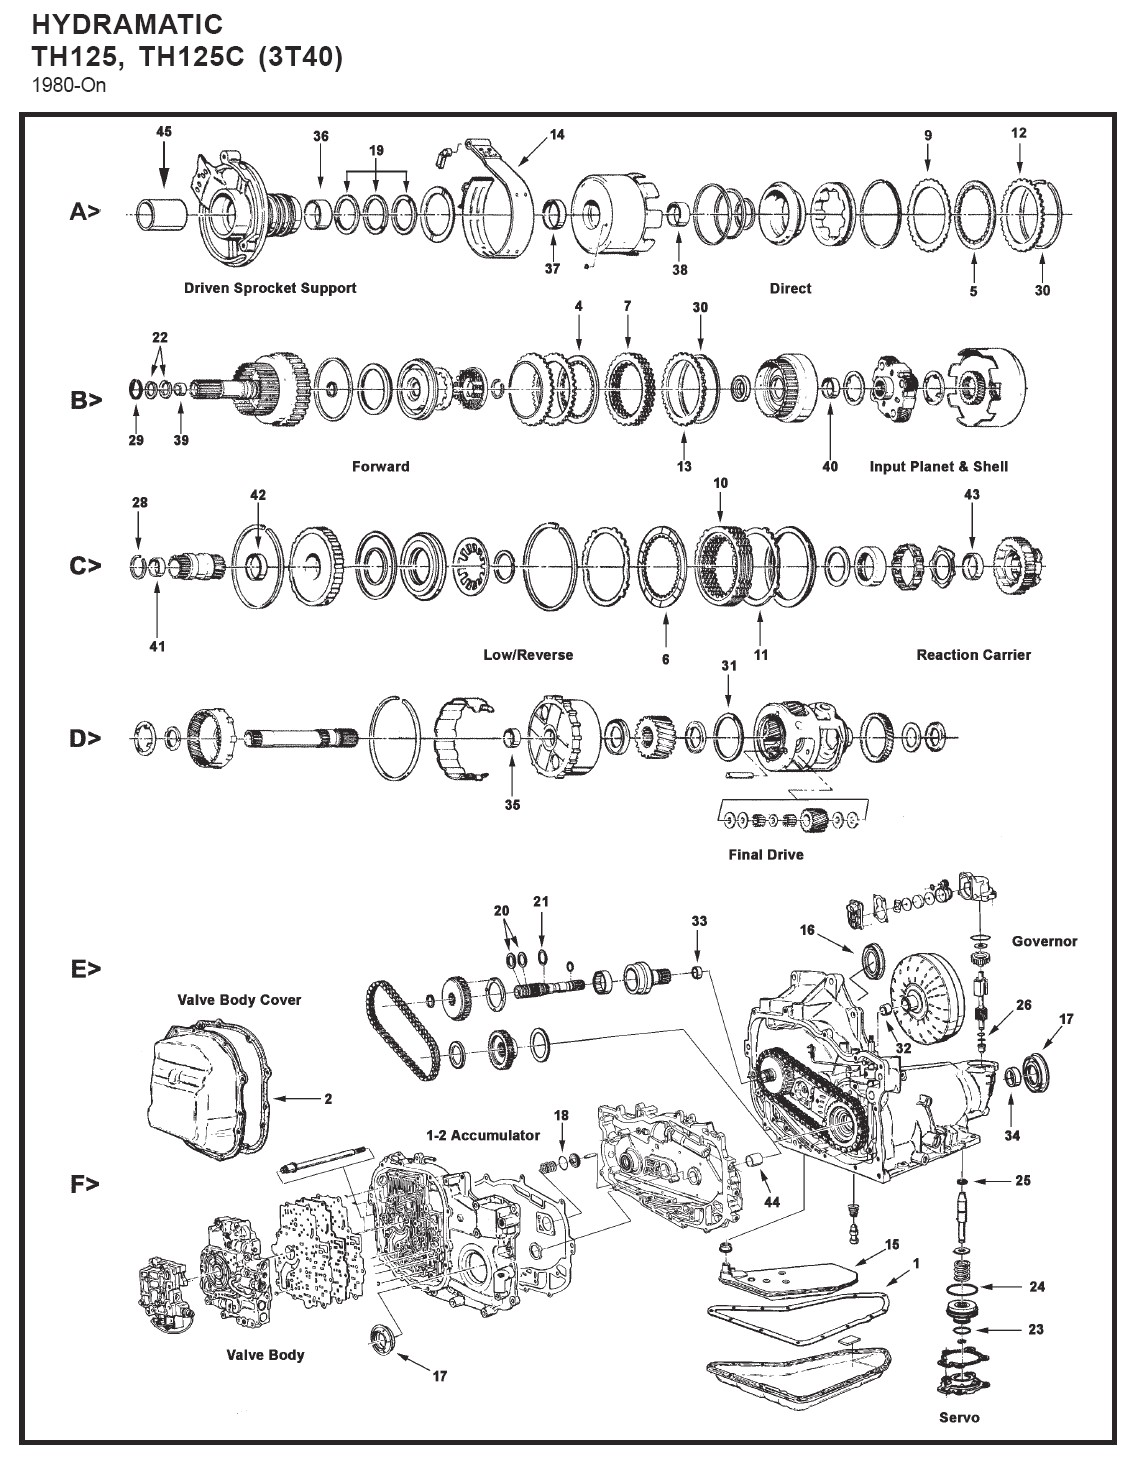
The major components of this transaxle are:

The fluid pressure and shift points are controlled by throttle opening via a throttle valve (TV) cable.

The transaxle can be operated in any of six different modes shown on the shift quadrant.

P- Park position prevents the vehicle from rolling either forward or backward

R- Reverse allows the vehicle to be operated in a rearward direction

N- Neutral allows the engine to be started and operated without driving the vehicle.

D- Drive position is used for all normal driving conditions. It provides three gear ratios plus converter clutch operation.

2- Manual Second is used to provide acceleration and engine braking.

1- Manual Lo is used to provide maximum engine braking.

1st and 2nd gears may be selected at any vehicle speeds.

Gear Ratios

First Second Third Forth Reverse
2.840
1.600
1.000
N/A
2.067


"THM 125C" MODEL & FINAL DRIVE RATIO TABLE

FINAL DRIVE RATIO
2.84
3.06
3.33
MODEL
BDC, BJC, CBC, CMC, CRC, CJC, CUC, CNC,CTC, CXC, KDC, LKC, PDC, PKC, PMC, PPC, PNC, PSC, PWC CAC, CCC, CSC, CDC, HLC, HRC, JAC, JDC, JWC, PHC, PTC, TAC, TBC CPC, HYC, HZC, JFC, JKC, JMC, JNC, JPC, JTC, JUC, JXC, LHC, RAC, RCC

RANGE REFERNCE CHART

RANGE
GEAR
DIRECT CLUTCH
INTERMEDIATE BAND
FORWARD CLUTCH
ROLLER CLUTCH
LO-REVERSE CLUTCH
DRIVE

FIRST SECOND THIRD


APPLIED

APPLIED

APPLIED APPLIED APPLIED

HOLDING


INTERMEDIATE
FIRST SECOND


APPLIED

APPLIED APPLIED

HOLDING


LO

FIRST


APPLIED


HOLDING


APPLIED


REVERSE


REVERSE


APPLIED


APPLIED


Maintenance Information


Transaxle fluid check (every 3,000 miles or 3 months)

  1. The level of the automatic transaxle fluid should be carefully maintained. Low fluid level can lead to slipping or loss of drive, while overfilling can cause foaming and loss of fluid.
  2. With the parking brake set, start the engine, then move the shift lever through all the gear ranges, ending in Park. The fluid level must be checked with the vehicle level and the engine running at idle. Note: Incorrect fluid level reading will result if the vehicle has just been driven at high speeds for an extended period, in hot weather in city traffic, or if it's been pulling a trailer. if any of these conditions apply, wait until the fluid has cooled (about 30 minutes)
  3. With the transaxle at normal operating temperature, remove the dipstick, located on the left side of the engine compartment.
  4. Wipe the fluid from the dipstick with a clean rag and push it back into the filler tube until the cap seats.
  5. Carefully touch the end of the dipstick to determine the temperature of the fluid. It may be cool, warm or hot.
  6. Wipe the fluid from the dipstick with a clean rag and push it back into the filler tube until the cap seats.
  7. Pull the dipstick out and note the fluid level.
  8. If the fluid felt cool or warm, the level should be between the dimples between the full mark.
  9. If the fluid felt hot, the level should be in the cross hatched area near the "Full" mark.
  10. Add just enough of the recommended fluid to fill the transaxle to the proper level. It takes about one pint to raise the level from the add mark to the full mark with a hot transaxle, so add the fluid a little at a time and keep checking the level until it's correct.
  11. The condition of the fluid should also be checked. If the fluid is a dark reddish-brown color, or if the fluid exhibits a burned smell, the transaxle fluid should be changed. If you are in doubt about the condition of the fluid, purchase some new fluid and compare the two for color and smell.


Transaxle fluid and filter change(every 30,000 miles or 30 months)

  1. Since there is no drain plug, the transaxle oil pan must be removed to drain the fluid. Before beginning work, purchase 5 quarts of Dexron III, and a new filter.
  2. Other tools necessary for this job include jackstands to support the vehicle in a raised position, a drain pan capable of holding at least eight pints, newspapers and clean rags.
  3. The fluid should be drained immediately after the vehicle has been driven. This will remove any built up sediment better than if the fluid were cold. Because of this it is wise to wear protective gloves. Fluid temperatures can exceed 350 degrees in a hot transaxle.
  4. After the vehicle has been driven to warm up the fluid, raise it and place it on jackstands for access underneath.
  5. Move necessary equipment under the vehicle, being careful not to touch any hot exhaust components.
  6. Place the drain pan under the transaxle fluid pan and loosen, but do not remove, the bolts at one end of the pan.
  7. Moving the around the pan, loosen all the bolts a little at a time. Be sure the drain pan is in position, as fluid will begin dripping out. Continue in this manner until all the bolts are removed except for one at each of the corners.
  8. While supporting the pan remove the remaining bolts and lower the pan. If necessary, use a screwdriver to break the gasket seal, but be careful not to damage the pan or transaxle gasket surfaces. Drain the remaining fluid into the drain pan. As this is done check the fluid for metal particles, which man be an indication of internal failure.
  9. Now visible at the bottom of the transaxle is the filter/strainer.
  10. Remove the filter and O-ring seal.
  11. Thoroughly clean the transaxle fluid pan with solvent. Check for metal filings or foreign material. Dry with compressed air if available. It is important that all remaining gasket material be removed from the pan mounting flange. Use a gasket scraper or a putty knife for this.
  12. Clean the filter mounting surface on the valve body. Again this surface should be smooth and free of any leftover gasket material.
  13. Install the new filter with a new O-ring seal
  14. Press the new gasket into place on the pan, making sure all bolt holes line up.
  15. Lift the pan up to the bottom of the transaxle and install the mounting bolts. Tighten the bolts in a diagonal pattern working around the pan. Using a torque wrench tighten the bolts in a criss-cross pattern to ~10ft-lbs.
  16. Lower the vehicle
  17. Open the hood and remove the transaxle fluid dipstick.
  18. Add about 4 quarts of fluid to the transaxle through the filler tube. Use a funnel to avoid spills. It is best to add fluid a little at a time, continually checking the level with the dipstick. Allow the fluid time to drain into the pan.
  19. With the selector lever in Park, apply the parking brake and start the engine without depressing the accelerator pedal (if possible). Do not race the engine - run it at idle only.
  20. With the engine idling, check the level on the dipstick. Look under the vehicle for leaks around the transaxle oil pan mating surface.
  21. Check the fluid level to make sure it is just below the "Add" mark on the dipstick. Do not allow the fluid to go above this point as the transaxle would the be overfilled, necessitating the removal of the pan to drain excess fluid.
  22. Push the dipstick firmly back into it's tube and let the engine idle, with the transaxle in park, for three minutes. Check the fluid level again and add as necessary to bring the fluid level to just above the add mark. Now drive the vehicle far enough to reach normal operating temperature in the transaxle. This should take just a few miles of highway driving, slightly less in the city. Park the vehicle on a level surface and check the fluid level on the dipstick with the engine idling and the transaxle in park. The level should now be at the "Full" mark on the dipstick. If, not add more fluid, a little at a time, to bring the level up to this point. Again, do not overfill.